기술노트
| [Linux] PDNS-네임서버 (PowerDNS) 설치 및 replication | |
|---|---|
| 작성자 : 관리자(jieun@ehostidc.co.kr) 작성일 : 2018-06-18 조회수 : 6620 | |
|
OS : CentOS 7.4
1. pdns 설치(1차/2차 공통) a. repo 설치 [root@ns1 ehost]# yum install epel-release -y
b. pdns 및 mariadb 설치 [root@ns1 ehost]# yum install mariadb-server mariadb  [root@ns1 ehost]# yum install pdns pdns-backend-mysql 
c. DB 설정 [root@ns1 ehost]# systemctl start mariadb [root@ns2 ehost]# mysql_secure_installation 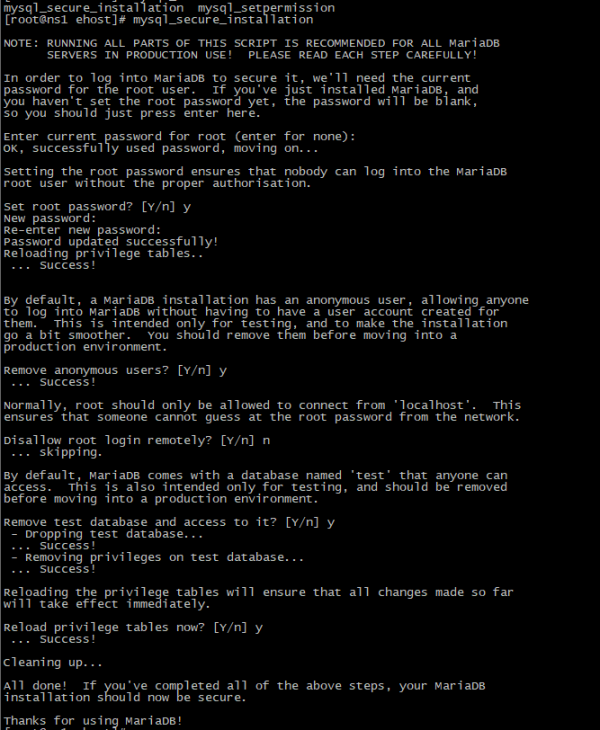
d. pdns db 생성
[root@ns1 ehost]# mysql -u root -p Enter password: Welcome to the MariaDB monitor. Commands end with ; or \g. Your MariaDB connection id is 9 Server version: 5.5.56-MariaDB MariaDB Server
Copyright (c) 2000, 2017, Oracle, MariaDB Corporation Ab and others. Type 'help;' or '\h' for help. Type '\c' to clear the current input statement. Query OK, 1 row affected (0.00 sec) MariaDB [(none)]> GRANT ALL ON pdns.* TO 'pdns'@'localhost' IDENTIFIED BY 'pdns패스워드'; Query OK, 0 rows affected (0.00 sec) - ( SOA접근 USER 추가 ) MariaDB [(none)]> GRANT ALL ON pdns.* TO 'pdns'@'testdns' IDENTIFIED BY 'pdns패스워드'; Query OK, 0 rows affected (0.00 sec) MariaDB [(none)]> FLUSH PRIVILEGES; Query OK, 0 rows affected (0.00 sec) 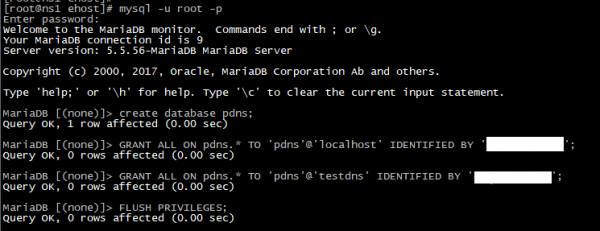
e. pdns DB import [root@ns1 ehost]# cd /usr/share/doc/pdns-backend-mysql-3.4.11/ [ehost@ns1 pdns-backend-mysql-3.4.11]# mysql -updns -pdlghtmxm1509 pdns < schema.mysql.sql
2. pdns 설정 (/etc/pdns/pdns.conf ) a. 1차 네임서버 allow-axfr-ips=2차네임서버IP/32 master=yes launch=gmysql gmysql-host=localhost gmysql-user=pdns gmysql-password=pdns패스워드 gmysql-dbname=pdns 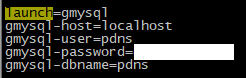
b. 2차 네임서버 master=no slave=yes slave-cycle-interval=60 gmysql-host=localhost gmysql-user=pdns gmysql-password=pdns패스워드 gmysql-dbname=pdns
- 2차 서버 DB 설정 [root@ns2 ehost]# mysql -u pdns -p mysql > use pdns; 2차 네임서버 도메인
3. 서비스 등록 및 시작(1/2차 네임서버 공통) [root@ns1 ehost]# systemctl enable mariadb [root@ns1 ehost]# systemctl enable pdns [root@ns1 ehost]# systemctl start pdns
4.powerdns admin 셋팅(1/2차 네임서버 공통) a. http/php 설치 [root@ns1 ehost]# yum install httpd php php-devel php-gd php-imap php-ldap php-mysql php-odbc php-pear php-xml php-xmlrpc php-mbstring php-mcrypt php-mhash gettext 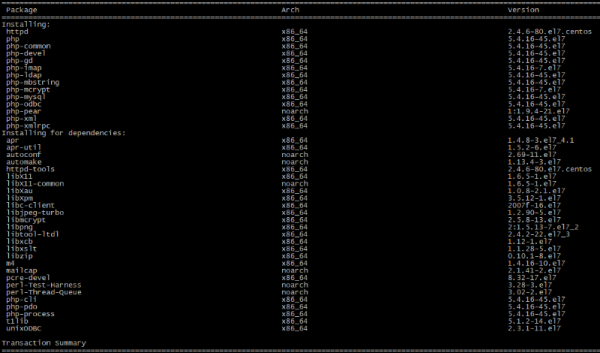 [root@ns1 ehost]# yum install php-pear-DB php-pear-MDB2-Driver-mysql 
b. 웹소스 다운로드 [root@localhost ~]# cd /var/www/html [root@localhost ~]# wget http://downloads.sourceforge.net/project/poweradmin/poweradmin-2.1.7.tgz
c. 해당 파일 압축해제 및 poweradmin 으로 폴더 이름 변경
d. http://61.97.255.11:8080/poweradmin/install/ 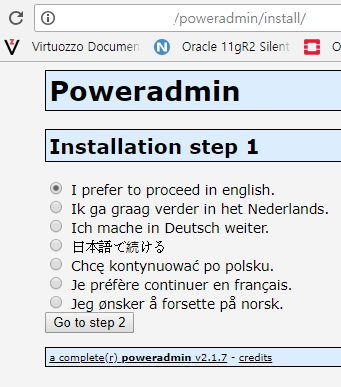 - db 접속 정보 셋팅 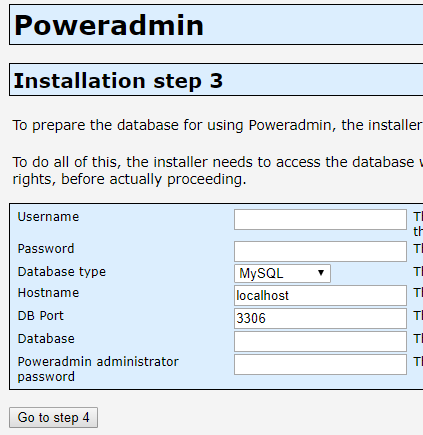 - 사용자 ID/패스워드/hostmaster/1,2차 네임서버 입력 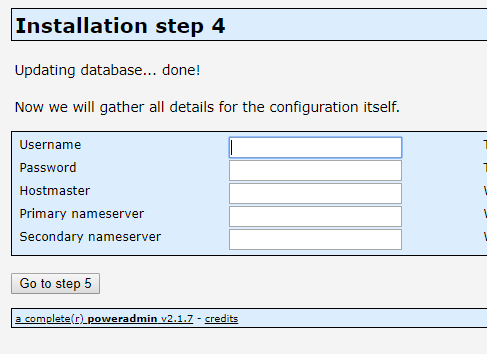 - 아래 내용의 쿼리를 디비에서 실행 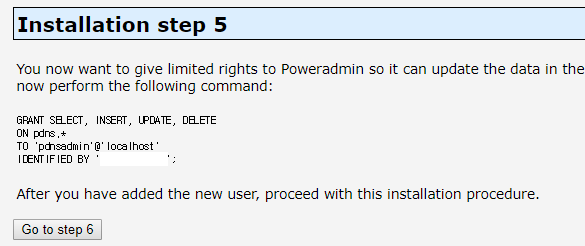
- cp inc/config-me.inc.php inc/config.inc.php - inc/config.inc.php 파일 수정 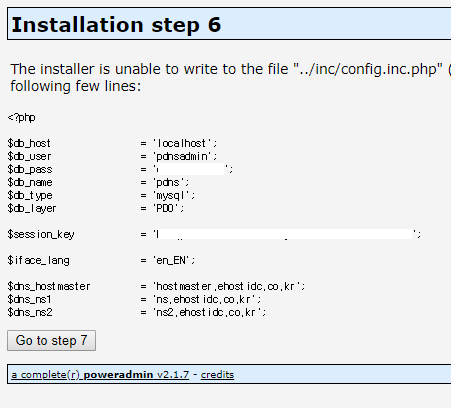 - install 폴더 삭제 후 http://"서버IP"/poweradmin 로 접속 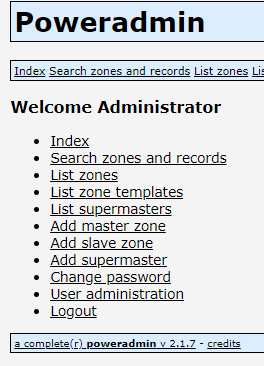
- 1차 서버에서는 Add master zone 에 도메인 셋팅 - 2차 서버에서는 Add slave zone 에 1차와 동일한 도메인 셋팅
- 1차 서버에서 도메인 zone 업데이트 시에 2차로 자동 전파
5. 문제점 및 해결책(?) a. 도메인 설정을 1/2차에 모두 해야 하는 점. b. 1/2차 모두 master 로 설정 후 DB를 mysql replication 셋팅하면, 2차 pdns 에 도메인 셋팅 이슈가 없으질듯.
cf. mysql replication 이용해서 설정했을때 오류 발생
|
|
| 이전글 | [Linux] mysql replication |
| 다음글 | [Linux] name 서버 설치(bind) |